The October release countdown teasers start today and we are delighted to have the fabulous Francine Vuillème joining us again. Francine was such an amazing September Guest Designer, we begged her to stay a little longer!
Also joining us this month is the incredible Caly Person and we couldn't be more excited! Caly is unbelievably talented, her creativity leaves us speechless and we can't wait for you to be inspired by her amazing creations. We are beyond thrilled to have her on board this month.

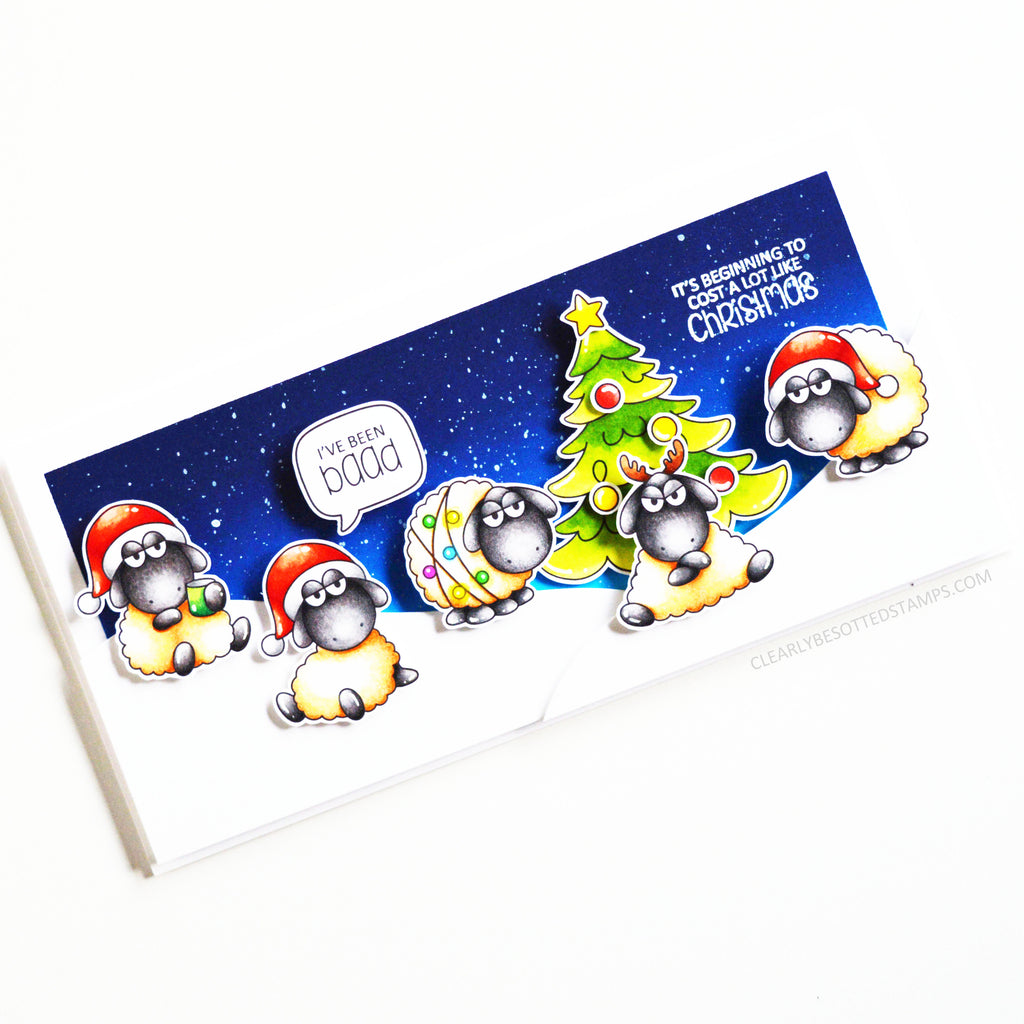
There are eight new stamp sets coming on the 1st of October and today we're introducing a stamp set called Baa Humbug.
It's Beginning To Cost A Lot Like Christmas
Instructions
- DL white card base (4" x 8.5" approx.) landscape
- Mask off a border using washi tape on 10 cm x 20 cm white card
- Ink blend background using mini ink blending tool with two shades of blue ink and add starry sky detail using white ink spray
- Allow to dry thoroughly before stamping sentiment on top with watermark ink, sprinkle over white embossing powder and set with heat tool
- Remove washi tape and adhere to card base using foam sheet cut to size and adhesive roller
- Die cut snowdrifts from white card and adhere to card using foam pads
- Stamp sheep and tree in black ink on to separate white card, colour with markers and add white highlight detail with gel pen
- Cut out sheep and tree with scissors and adhere to card using foam pads
- Stamp speech bubble and sentiment in black ink on to separate white card, cut out with scissors and adhere to card with foam pads
It's Beginning To Cost A Lot Like Christmas

Instructions
- A6 white card base (4" x 5.5" approx.) portrait
- Stamp Christmas scene in black ink on to 10 cm x 14 cm white card and mask
- Ink blend background using mini ink blending tool with blue ink
- Remove mask, colour scene with markers and add white highlight detail with gel pen
- Adhere to card base using foam sheet cut to size and adhesive roller
- Stamp sheep in black ink on to separate white card, colour with markers and add white highlight detail with gel pen
- Cut out sheep with scissors and adhere to card using foam pads
- Die cut speech bubble from white card, stamp sentiment in black ink and adhere to card with foam pads
Put Me On The Naughty List

Instructions
- A6 white card base (4" x 5.5" approx.) portrait
- Die cut large rectangle aperture from mylar sheet to create reusable stencil
- Position custom made stencil centrally on top of 10 cm x 14 cm white card and secure in place with washi tape
- Ink blend background using mini ink blending tool with two shades of blue ink and add starry sky detail using white ink spray
- Adhere to card base using foam sheet cut to size and adhesive roller
- Die cut snowdrift from white card and adhere to card using foam pads
- Stamp sheep in black ink on to separate white card, colour with markers and add white highlight detail with gel pen
- Cut out sheep with scissors and adhere to card using foam pads
- Stamp speech bubbles and sentiments in black ink on to separate white card, cut out with scissors and adhere to card with foam pads
- Stamp sentiment in black ink
Please check in on our fantastic Design Team for more countdown teasers:
Thank you very much for joining us today.
Clearly Besotted Supplies
- Baa Humbug stamp set
- Picture It Christmas stamp set
- Speaking Out stamp set
- Trimming The Tree stamp set
- You Said It Die Collection (retired)
Other Supplies
- Neenah Solar White 110lb card stock
- Spellbinders Nestabilities rectangle dies
- My Favorite Things Snow Drifts dies
- Memento Tuxedo Black ink pad
- VersaFine Onyx Black ink pad
- VersaMark ink pad
- Versacolor Ink pads
- Ranger Distress Spray Stain Picket Fence
- Copic Sketch markers
- Uni-ball Signo white gel pen
- White embossing powder
- Mylar sheet 190 micron
- Inkadinkado stamping mask paper
- Ranger mini ink blending tool
- Heat tool
- MISTI stamping platform
5 comments
These sheep are super funny.. the one with the crossed legs it’s too funny!!!
Great cards.
These are SO much fun and I loooove all the preview cards!
talk about bringing a smile to my face! I think this may be my favourite set this month, cracks me up with the stop sign, dishevelled tree and their withering eyes 😄😄😄. Amazing cards as always! Xxx
Love these so much! These sheep just crack me up! So funny! Gorgeous cards, that ink blending! 😍 xx
These cards look very
sheepish to me. In a fantastically Xmas sort of way. Love the designs and colours and that night sky with just a sprinkling of snow is brilliant. X